Click image for a larger labeled Adobe Acrobat (.pdf) view in a new window
Click image for a larger labeled Adobe Acrobat (.pdf) view in a new window
Click image for a larger labeled Adobe Acrobat (.pdf) view in a new window
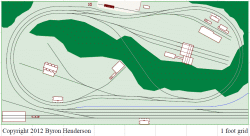
The Classic "Out and Back" HO 5X9
Comparing two approaches in the identical space
Most small island layouts (especially the HO 4X8s) are cramped and don't offer much room for scenery or operations. But expanding just a bit (in this case, to 5'X9') gives us more room to maneuver. The secret is to use one of John Armstrong's favorite concepts for smaller layouts: the out-and-back. One of the neat things about going to the five-foot width is that the yard can now be outside the continuous run loop, adding to the yard's length.

Trains from Yardley enter the layout at Conn Junction in a clockwise direction and may run as many laps as one likes before taking Baxter Switch to reverse to a counter-clockwise direction. After making as many laps as desired, trains return to the yard via Conn Junction once again.
This plan leaves room for two towns, each with significant switching and scenic opportunities. There's also room for some wooded hills to help separate the scenes visually. There's even room for one or two large industry structures, if desired.
With two passing sidings, more than one train could also be operated, and two crews could even be switching Weston and Eastridge at the same time without getting into one another's way. Local crews would need to constantly duck into the clear for orbiting trains, of course, so that's not the easiest*.
The interchange track at Yardley represents a connection with the outside world and serves as staging for cars arriving on and departing from the layout (cars are swapped by hand between sessions). This adds realism by giving operating trains a purpose. A crossover at the end of two of the yard tracks allows one arriving engine to escape – if the yard is not too full, that is. But nice to have, anyway.
This HO 5X9 model railroad maintains at least 20" minimum radius throughout, and much of the mainline is 22.5". Turnouts are PECO C83 throughout, the minimum size being a #5 – no Snap-Switches needed!
The design above is intended for smaller diesels, as there's no way to turn an engine. But it would even be possible to squeeze in a small turntable, here at right the Atlas surface-mount model.
Of course, if there is space for a 5X9 and its aisles, there's probably room for something that will look and run much better (don't fear the saw!). But this layout shows that even in an HO 5X9 island, there is room for a reversing connection, some operating realism, and some scenery.
Contact me if I can help you with a design for an island layout (or around-the-room), large or small!
Additional options in HO and N
*An interesting option is to make this design double-track all around to allow one train to orbit while another works (see below). Although I personally like the feeling of two towns that the short sections of single track create, others have told me that they much prefer the double-track – and I have done some variations on that version for clients. Here's one below:


Note: In the strictest sense, one wouldn’t need both of these crossovers – they are schematically equivalent. But I think the two of them offer more flexibility for two crews needing runarounds to work each town.
I have had requests for a more detailed view of the double-tracked 5X10 "out-and-back" HO track plan showing radii, turnouts, etc. Just click the image at right to download an Adobe Acrobat (.pdf) file showing these details.

Click image for an Adobe Acrobat (.pdf) file of HO 5X9 double-track layout details
I also had a request to recast the out-and-back concept as an N scale layout to fit a 4X8 sheet. Unlike the HO 4X8, and N scale 4X8 provides a very roomy space for a nice implementation of the basic idea. Click the image at right to download a larger labeled Adobe acrobat file (.pdf).
Click image for an Adobe Acrobat (.pdf) file of N 4X8 layout details