Click image for a larger labeled Adobe Acrobat (.pdf) view in a new window
Click image for a larger labeled Adobe Acrobat (.pdf) view in a new window
Click image for a larger labeled Adobe Acrobat (.pdf) view in a new window
Please Don't Pick the Cherries
A tutorial on one good method for switching classification yards
There are many ways to work a model (or prototype) yard. One of the least efficient ways is to "Cherry Pick". This involves looking over the whole yard, selecting the dozen or so cars one needs from all the tracks, then pulling each track individually in turn to pick out just those cars while putting back the rest.
Prototype flat (non-hump) classification yards are not typically operated in this fashion. Instead, tracks are pulled as few times as possible to increase efficiency.
This is not the only way, of course, but it works well even if there are only one or two tracks clear. To illustrate this idea, we'll go through an example of one way to switch a flat classification yard in the model. This example is very simplified, focusing only on classifying what exists in the yard at the start of the session. In fact, of course, new cars would be added as trains set-out blocks or terminated in the yard.
The yard configuration itself is also very simple: a single-ended flat yard with no arrival/departure tracks. Cars are needed in this order: Amboy Local; Eastbounds; Baker-Cadiz Local; Westbounds. Cars for the two locals must be classified before leaving the yard, but there is no specific station order required within the East or West blocks. Placing the cars for each local involves placing them in order from 1 to 3 reading from left to right. For the Backer-Cadiz local, cars should be placed B 1-3, then C 1-3, again reading left to right. Also assume that our switcher can only pull about 8 or 9 cars at a time (about the capacity of each track plus one or two cars). We'll also assume that we can't "kick" cars but will need to move them all the way to their final location with the switcher.
Below is the situation when the yard crew comes on duty (Figure 1).

"... tracks are pulled as few times as possible to increase efficiency."

There are five groups of cars in the yard: eastbound cars for destinations off the layout (long Easts, blue cars labeled "E"); long Wests (gold cars labeled "W"; cars to be blocked for the local to the town of Amboy (green, labeled "A 1-3" for their blocking order), cars to be blocked for the local which serves the two towns of Baker and Cadiz (red, labeled "B" or "C" and numbered for their blocking order), and cars that won't be needed until tomorrow (the next session) or later (brown, labeled "T").
Obviously, this yard is a little too full, but since we won't be getting any inbounds that situation will improve as we start to make our moves. What's the best first move? There may not be one "right" answer. My experience of watching many different operators of varying degrees of experience switch the same model yard suggests that experience and exposure play some role in how operators approach the task, but there is probably also some component of individual differences in the way we each see and categorize the world. This has been true even for different prototype railroaders operating on that same modeled yard: each approached the job differently based on experience and personal perception.
One less-efficient way would be to cherry-pick the tracks to start building the Amboy train. I have watched novice operators do just this in similar situations and they do a good job of getting the first train done. Unfortunately, because they have made no progress on the second or third block while switching the first, those trains or blocks are not ready when the call time comes and the session can begin to bog down. Certainly, the stress level in the yard increases! Cherry-pickers might be tempted by that A3 car sitting at the end of track 5 and start building the Amboy train on the open track 2. It should be noted that cherry-picking does work -- for the first train or block. The result of a strict cherry-picker working our yard can be seen in Figure 2 below. After many back and forth moves pulling from three tracks, Amboy's ready. But the rest of the yard is still a "dog's breakfast".

Cherry picked – and that's not good. one train is ready, but the rest of the yard is no "smarter."
"...even different prototype railroaders operating on [the] same modeled yard ... approached the job differently ..."
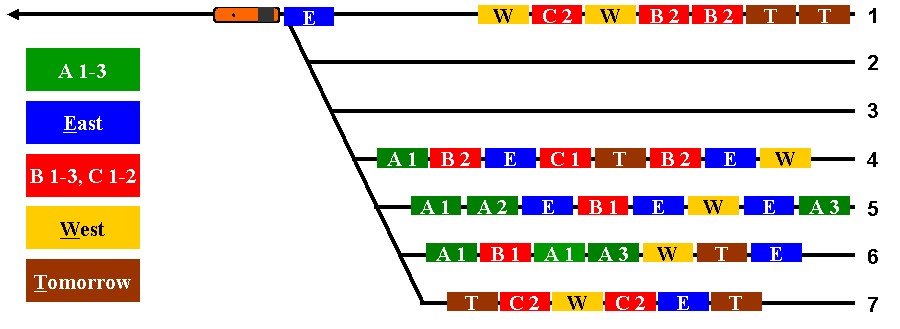
The alternative approach seeks to work each track as few times as necessary while still keeping in mind the order in which cars are needed (Amboys, Easts, Baker-Cadiz cars, and finally Wests). Tracks 5 and 6 are pretty rich in Amboys and Easts, so those are tempting first moves. My personal preference, though, would be to grab ... track 3!
Yes, there are multiple ways to approach this and other first moves could also work well. But my reasoning is that I'd like to have more tracks open to use for classifying cars. Track 3 has a fairly short cut of cars and there is an East right on the end that will be next to the engine so I can hang on to it for later moves. And I'll shove the rest of the cars from 3 down on track 1. It's the longest, so it makes a good "slop" or "for now" track. And there are already those two "Tomorrow" cars at the end that I may not need to touch again if I am lucky. Because we can't kick cars I'll take this opportunity to push the cut to the end of the track since I know I'll need the space later.
So after my first quick move or two, I've cleared an extra track and I'm holding on to that East car (Figure 3).
A couple moves after starting with ... Track 3

Car-car pockets for each track and dividers help crews keep things straight while shuffling cars around the yard.
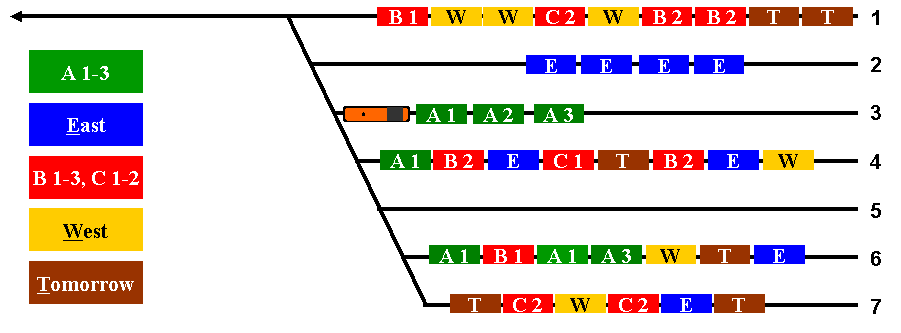
Now I'd probably latch on to track 5. It's got the highest percentage of Amboys and Easts. (Track 4 is another good candidate since it's adjacent to the open tracks, but I've got other plans for that one). The other nice thing about track 5 is that the Amboys on that track happen to already be in station order -- always something to exploit where possible.
Now I'll start pushing the cars from track 5 onto tracks 1, 2, and 3. I've arbitrarily picked track 2 for the Easts and track 3 for the Amboys. Wests and Baker-Cadiz cars from track 5 are sloughed off to my growing "for now" classification (track 1). After pulling just two tracks, the yard is starting to look more organized and I have another empty track (Figure 4, below). Creating empty tracks for future moves is often a good strategy.
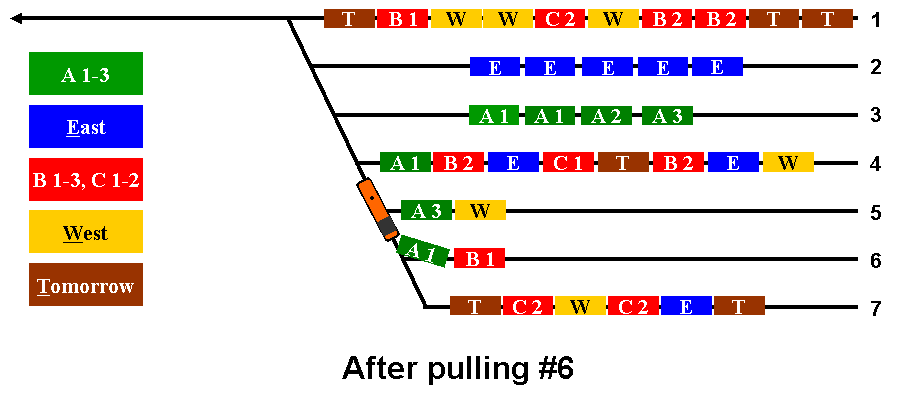
Now the call time for Amboy is coming up and I need to be as efficient as possible with my next move. I figure I can grab that lonely Amboy A1 from track 4 as one of my last moves before pulling out the completed Amboy cut, so next I'll come against the # 6 rail. As before, I put the Tomorrow car on my "for now" track 1, East to track 2, Amboys to 3.
But looking ahead, I put the Amboy 3 car and the West car together on the empty track 5 and the lone Baker car back on track 6 while still holding on to that last A1 from track 6. So now I have pulled three tracks (3, 5, and 6). We're almost ready for the Amboy train to depart; and the yard "keeps getting smarter". (Figure 5, below)
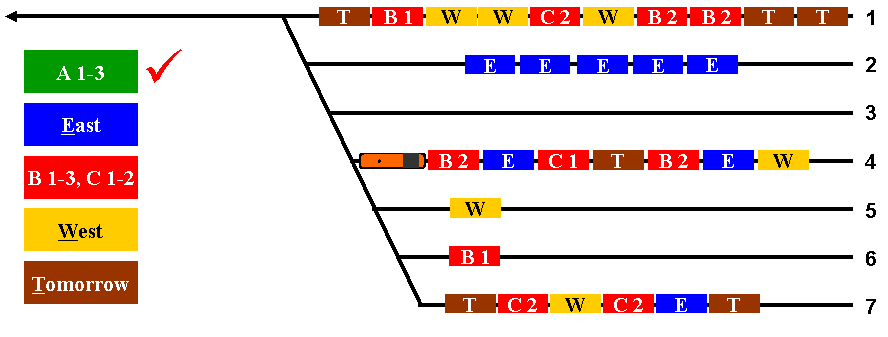
Now let's get Amboy out of here. Still coupled to the A1 car from track 6, I run a little ways up the ladder and back down on the A1 car at the end of track 4 (which has been waiting so patiently). Back up the ladder to pick up the Amboy train on track 3, push the whole cut back down on the Amboy 3 at the end of track 5 (Figure 6), then take the completed train (all in station order, by the way) out to depart.
After that little "back and fill", we take the completed train out to departure and return. The yard now has another empty track (Figure 7, below) -- but the eastbound block will be called for any minute.

Dry-erase boards for noting changing track assignments, yard crew instructions, and a call list for upcoming trains are perfectly positioned on Rick Fortin’s ATSF.
I estimate I've got time to pull one more track, so track 4 is the obvious candidate. Easts are going on track 2 and the West on Track 5 as expected, but I'll put the Baker-Cadiz cars on track 3 (not on track 6 with their lone B1 compatriot). I see the potential for doing the "tack on and go" move again and it might work out.
But now it's time for that Eastbound block and we hustle it off to depart. After that move the yard is really opening up and becoming ever more organized (Figure 8, below). And we've only pulled four tracks.

But wait, Byron, you missed an East!
Yes, I did. In fact, I avoided touching track 7 altogether. Real railroads don't cherry-pick to make sure that they put every single car possible into every single block. The prototype railroaders know that there will be another eastbound later today or tomorrow -- plenty of time to get that East on track 7 into an outbound block. It's very rare when the railroad singles out a specific car in a yard ... that's just another form of cherry-picking.
Of course, this situation is more than a little unrealistic, since no cars have arrived. In an actual op session there would be cars arriving and the yard job would have to make decisions about those incoming blocks based on the cut-off times for the jobs.
But let's finish what we started. Building the Baker-Cadiz train on tracks 2 and 3 and the westbound block on track 5 seems like the best approach. A good step might be grabbing track 7 next since those two C2 cars will anchor the Baker-Cadiz block on track 2. Wests are going on track 5, and we'll start putting Tomorrows on 4 (and that "East" is now a Tomorrow, so we'll put it there as well). After working track 7, the yard looks like this (Figure 9, below).
" ... prototype railroaders know that there will be another eastbound later today or tomorrow ."
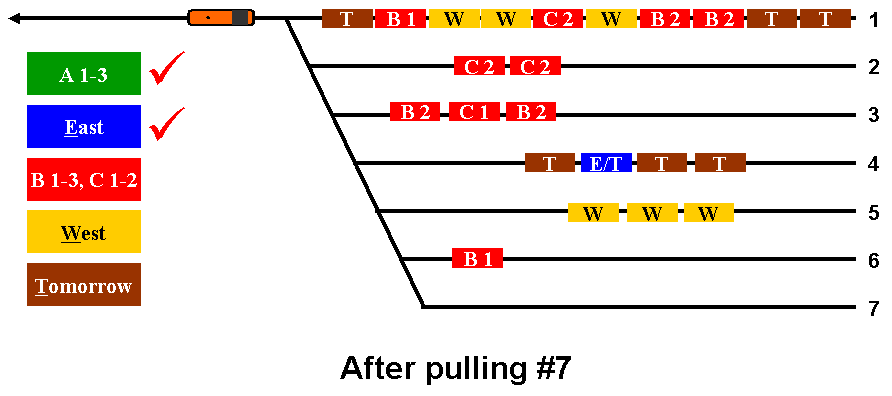
So now we've pulled five tracks, the yard continues to become more classified, and now we get a little bonus, we can finish our final block (Westbounds) while we are working the Baker-Cadiz train. So we put our switcher against the cars on track 1. We stipulated earlier that our switcher can only pull 8 or 9 cars, so we cannot get the whole cut at once.
There are a couple of ways to go here and sometimes it's fun to make the choice based on what the real crews would do to avoid walking. Let's assume that we like our brakeman and don't want him or her to have to walk all the way down to where those two Tomorrows are at the end of Track 1. So instead, we'll make an extra move. We'll ask the brakie to pull the pin between the first and second car on the track, then pull that Tomorrow out and stash it on track 4. The brakeman can ride the car down to 4 and jump back on the loco after we set out the car.
Now that we can pull the string in one move, we'll set out those two end Tomorrows on 4, the Wests on 5 (completing that block), The B2s on 3, the C2 on 2 and we'll hold on to the B1. (Figure 10 below)
"Let's assume that we like our brakeman and don't want him or her to have to walk ..."
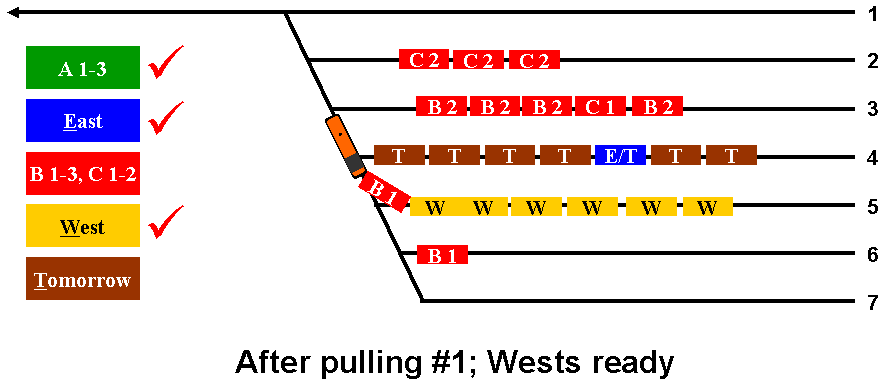
But we don't run the Wests out to departure now -- the Yardmaster usually doesn't like getting blocks out of order or early any more than he or she likes getting them late. But sometimes it makes sense to build a block early if we can do it easily while working on other blocking as we did here. So we let the Wests sit for the time being and continue working the Baker-Cadiz train.
Since we're holding a B1 already, we grab the lone B1 on track 6, which leaves us in good shape to do a quick shuffle to put the Baker-Cadiz train together. We'll come against the B2s on track 3, pull them out and leave the last B2 on track 3 to clear that C1. Push the string into track 2 so the C1 comes against the C2s already on track 2, break our train again between B1s and B2s, duck back in for the last B2 on the adjacent track 3 and then put the train back together, ready to depart. (Figure 11 below)
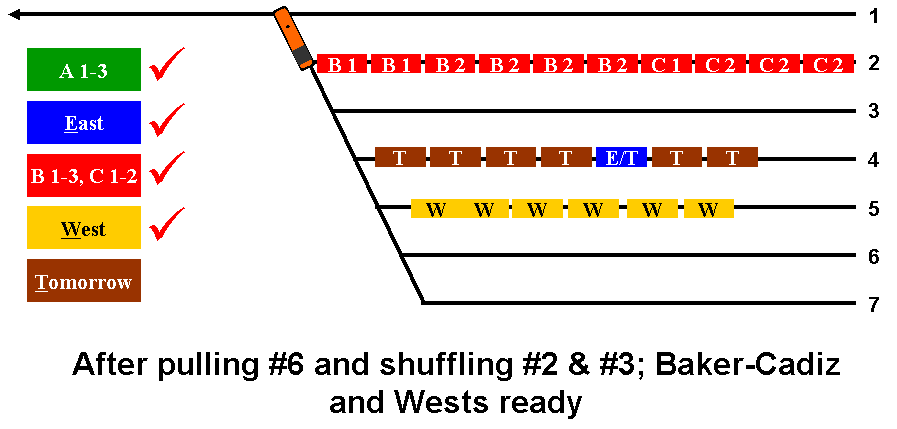
That wraps up our switching in the yard and we can haul the Baker-Cadiz train and the West block out to departure when the Yardmaster needs them. All accomplished with a lot less work than cherry-picking each train. Because the yard "keeps getting smarter" as we pull and work each track, fewer total moves are required, there's less walking by our imagined crews, and we gain more efficiency overall. That's the way to run a railroad!
"All accomplished with a lot less work than cherry-picking each train."